Tuesday, September 29, 2009

sweet potato gnocchi with fried sage


I've been wanting to make gnocchi for a long time. Each time I think about doing it, though, I find some reason not to, knowing that it's labor intense and fearing I won't do it right. But on Sunday, as I was flipping through the latest issue of Gourmet for inspiration and saw the sweet potato gnocchi recipe, I knew I needed to overcome my fears and give making gnocchi a go.

It turns out, making gnocchi is neither as labor-intensive or as difficult as I had imagined it would be. Granted, this would never be a weeknight dinner for me (at least not from scratch, as it is definitely time intensive), but making gnocchi was a fun way to spend my Sunday afternoon. Bonus: this recipe makes more than twice the amount that JR and I can eat for a meal, and the uncooked gnocchi can be frozen (first in 1 layer on baking sheet, then transferred to a sealable bag; do not thaw before cooking) for up to 1 month. So maybe weeknight gnocchi is a possibility, after all...

I followed the recipe nearly exactly - my only modifications were the omission of chestnuts (I'm not a big fan and also didn't feel like going to the grocery to hunt some down) and I also skipped a step where you were supposed to roll the gnocchi into a ball and press it down the backside of a fork - I wanted my gnocchi to look like little pillows, like what I've had in restaurants. It turned out just like I was hoping it would.

Sweet Potato Gnocchi with Fried Sage
Serves 6

1 1/4 lb. russet potatoes (~2 large)
3/4 lb. sweet potato (~1 medium)
1 large egg
1/2 tsp. nutmeg
1/3 c. grated Parmigiano-Reggiano, plus more for serving
1 1/2 - 2 c. all-purpose flour, plus more for dusting
1/3 c. extra virgin olive oil
1 c. sage leaves
2 Tbsp. unsalted butter

Preheat oven to 450 degrees. Pierce russet and sweet potatoes with a fork several times. Bake in a 4-sided sheet pan until just tender, about an hour.

Cool potatoes slightly, then peel and force through a potato ricer into the sheet pan, spreading into an even layer. Allow to cool completely. Lightly flour two sheet pans. Set aside.

Beat together egg, nutmeg, 1 tsp. salt, and 1/2 tsp. pepper in a small bowl. Gather potatoes into a mound in sheet pan and form a well in the center. Pour egg mixture into well, then knead into potatoes. Knead in cheese and 1 1/2 c. flour, then knead, adding more flour as necessary (I didn't end up adding any more), until mixture forms a smooth but slightly sticky dough.


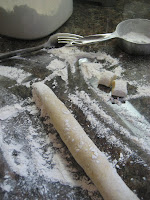
Cut dough into 6 pieces. Form 1 piece of dough into a 1/2-inch thick rope on a lightly floured surface. Cut rope into 1/2-inch pieces. Transfer gnocchi to baking sheets. Repeat with remaining 5 pieces of dough.

Heat oil in a 12-inch skillet over medium heat until it shimmers. Fry sage leaves, stirring, until they turn just a shade lighter and crisp (they will continue to crisp as they cool). Transfer to paper towels to drain. Season lightly with salt.

Add butter to oil in skillet with 1/2 tsp. salt and cook until golden brown, 1 to 2 minutes. Remove from heat.

Add half of gnocchi to a pasta pot of well-salted boiling water and stir. Cook until they float to the surface, about 3 minutes. Transfer with a slotted spoon to skillet with butter sauce. Cook remaining gnocchi in same manner, transferring to skillet as cooked. Heat gnocchi in skillet over medium heat, stirring to coat.

Serve sprinkled with fried sage and grated cheese.

This would be the perfect dish for entertaining, since you can make the gnocchi ahead of time and the dish comes together very quickly from the boiling-the-gnocchi point. The result is buttery, sagey, nutmegy delicious.

Monday, September 28, 2009

beet chips


This recipe was listed on the back of the weekly newsletter in the CSA box, which also contained a beautiful bunch of beets. Be sure to slice them super-thin for the crispiest result. A pretty purple (and antioxidant-packed) alternative to potato chips!

Beet Chips

1 bunch beets, stems trimmed to 1 inch
1 c. water
1 c. sugar
olive oil
sea salt & freshly ground black pepper

Peel beets with a vegetable peeler, then slice thin with a slicer or knife, using stems as handles.

Bring water and sugar to a boil in a 3-quart heavy saucepan, stirring until sugar is dissolved. Add beets, then remove pan from heat and allow to stand 15 minutes. Drain beets in a colander, discarding liquid, then let stand in colander 15 minutes more. 

Put oven rack in middle position and preheat oven to 225 degrees.

Grease a shallow baking pan with olive oil, then arrange beet slices snugly in 1 layer. Season with salt and pepper. Bake beets until dry, about 1 hour. Immediately transfer chips to a rack to cool (chips will crisp as they cool). Serve immediately.

Sunday, September 27, 2009

apple oat muffins


It is officially fall. Though we're in the middle of a heat wave in San Francisco, there is that difference in the air that comes with the change of seasons. The tomato plants have ceased to generate new fruit. The trees are beginning to redden. I'm sad to see summer go, but excited for the new crops that will ripen in the coming weeks and months. Kale. Butternut squash. Persimmons.

The farmers' market this morning featured primarily the remains of the summer crops - peaches, figs, zucchinis - they don't look quite as amazing as they did at the peak of the season. When I purchased my basket of figs, I was warned that this may be the last weekend they have them this year. Though the market in general looked more like summer on its way out than fall on its way in, there was one fall crop that looks like its already in full swing - apples.

I received an email from my friend Dave in Seattle about a week ago, in which he raved about the Gravenstein apples from Pike Place Market (I've been keeping my eyes open for them since reading this, but haven't seen any at our local farmers' market):

If you're unfamiliar, Gravensteins are only the best baking apples known to mankind. (If you or any of your readers don't believe me, have them ask their grandmothers. If grandma says otherwise, she's losing her memory.) Recipe? Core an apple 3/4 of the way through. Stuff it with a mixture of brown sugar, cinnamon, pecans or walnuts, and add a pat of butter on top. I'm trying a recipe that adds currants, so we'll see how that is, and I replaced part of the brown sugar with honey in one of my apples. I plunked the apples in a Pyrex dish that had some hot (almost boiling) water covering the bottom, then into the oven at 350 for 30-40 minutes. Nothing to it!

I came away from the market this morning with 6 beautiful Gala apples. JR announced that he no longer likes apples (not really sure where that came from, since he used to eat at least one a day). With this new knowledge, I decided that putting at least some of them
into something would probably be my best way to ensure that all will be consumed. When scanning the pantry, pondering what to do with my apples, oats jumped out at me as the perfect match. I briefly considered making apple-oat pancakes, but landed on muffins, since they could be consumed over the course of a couple of days. The apple-oat combination made me think of the packets of instant oatmeal I used to eat as a child. You can consider this to be a grown-up, portable version of apple cinnamon oatmeal (wrapped in muffin paper, instead of a paper pouch). Enjoy!

Apple Oat Muffins
Makes 12 muffins

Muffins:
1 c. rolled oats
1 c. oat flour
1 tsp. baking soda
1 tsp. baking powder
1 tsp. cinnamon
1/4 tsp. salt
1/2 c. unrefined coconut oil
1/2 c. maple syrup
1 large egg
1 c. plain greek yogurt
2 large apples, peeled, cored, and chopped

Topping:
1/4 c. walnuts, chopped
3 Tbsp. oats
1 Tbsp. maple syrup

Mix the dry ingredients (oats through salt) in a medium bowl; set aside. Mix the coconut oil, maple syrup, egg, and yogurt in a large bowl until well blended. Add the dry ingredients to the wet and stir until just mixed. Fold in the apple. Spoon batter into a paper-lined muffin tray.

In a small bowl, mix the topping ingredients. Sprinkle over muffins.

Bake in a 400 degree oven for about 20 minutes, or until muffins are golden.

Tonight, I may try out Dave's recipe. I'll let you know how it goes!

Saturday, September 12, 2009

cold quinoa salad


Summer is not over yet! (I won't believe it!) Though this morning is the first time I've seen rain in California for a couple of months, the temperature remains warm. The sunshine will be back soon, I'm positive (and hopeful).

I made this salad last week when we were having a stretch of hot days and I couldn't stand heating up the house or eating anything warm. It was one of those occasions when I didn't know exactly what I would make when I started the process - I scanned the cupboards and fridge to figure out what we had on hand that could be turned into a meal. I was hesitant about the nuts and sundried tomatoes at first, but went ahead and included them. I was glad I did: both brought great flavor and texture diversity to the dish. I will definitely make this again.

One thing I realized as I picked the labels for this post is that this is only my second post featuring quinoa. I find that surprising, since it's the grain component of our meals on a fairly regular basis. Quinoa is one of those foods I wasn't familiar with prior to moving to California. I encountered it for the first time at Google and have been a big fan ever since. The Complete Guide to Nutritional Health says that quinoa is "arguably the most nutritious of the grains". It contains vitamins E, B2, B3, calcium, magnesium, potassium, copper, iron, zinc, fiber, and protein. Bonus: it's gluten free. It has a slightly nutty flavor and can be used in place of rice in most dishes. I think I'd go so far as to classify it as my favorite grain. Stay tuned for more quinoa posts.

Cold Quinoa Salad
Serves 3-4

1 c. red or white quinoa
2 c. water
3 Tbsp. Italian parsley, chopped
1 Tbsp. mint leaves, finely chopped
1 pint cherry tomatoes
1 cucumber, sliced then quartered
1 handful pistachios
1/4 c. kalamata olives, pitted and halved
1/4 c. sundried tomatoes, chopped
balsamic vinegar and olive oil
feta (if desired)

Ahead of time: Bring the quinoa and water to a boil in a medium pot over high heat. Stir, cover, and reduce heat to simmer for 15 minutes, or until water is absorbed. Cool in fridge until you are ready to make salad. Alternative: if you're making the salad all at once, spread the quinoa on a plate and stick it in the freezer while you chop and combine other ingredients.

Combine all ingredients in a large bowl. Drizzle balsamic and oil over salad (I used about 3 Tbsp. of each) and mix well. Top with feta if desired.

Monday, September 7, 2009

homemade granola


I have been thinking about making homemade granola for quite some time. This weekend, it finally happened. I learned something interesting: granola is almost excruciatingly easy to make. And when I'm in charge, I get to throw in exactly what I want (no more pesky raisins!). I may never buy the pre-made stuff again...

Here's the basic recipe (which I cobbled together from a couple I found online):

Homemade Granola*
Makes 4-6 servings

3 c. rolled oats
1 c. seeds & nuts
1/2 tsp. cinnamon
a dash of salt
1/2 - 1 c. honey
1/2 c. dried fruit (optional)

*Cole's version #1 (pictured) - seeds & nuts: 1/4 c. sunflower seeds, 1/4 c. roughly chopped almonds, 1/2 c. roughly chopped walnuts; fruit: dried blueberry, cranberry, raspberry blend.
*Cole's version #2 - seeds & nuts, 1/2 c. sunflower seeds, 1/4 c. chopped almonds, 1/4 c. chopped walnuts, 1/4 c. peanuts; fruit: chopped dried apricots; I also substituted half of the honey with maple syrup.

Heat oven to 350 degrees. Combine all ingredients except fruit and honey in a large bowl. Add 1/2 cup honey. Stir to combine. Continue adding more honey to reach desired clumpiness. Spread mixture evenly in a metal baking pan. Bake 20-25 minutes, stirring regularly. Your goal is to get the granola to brown evenly without burning. The browner it gets without burning, the crunchier the result will be.

Remove granola from oven and add fruit. Cool on cookie sheet, stirring occasionally, until the granola reaches room temperature. Granola can be stored in an airtight container in the fridge indefinitely.

Saturday, September 5, 2009

fried green tomatoes


We are absolutely overrun with tomatoes at the moment. There are the sweet 100 cherry tomatoes and early girls that I have growing in pots along the side of the house; both plants are on the smallish side and are producing about the right amount for JR and myself as long as they are incorporated into at least one meal per day. But then there are the monstrous bushes that our neighbors planted along the other side of the house that we promised to help eat. That amounts to a lot of tomatoes! I've been keeping my eyes peeled for interesting new ways to use them.

This recipe was inspired by a recent post on VeganYumYum. Whereas the VeganYumYum's version of fried green tomatoes had an Italian twist, I decided to go in the Mexican direction. I de-veganized the recipe by adding eggs (I didn't have the powdered egg substitute on hand that was called for), added cumin and red pepper flakes to the batter, and topped with avocado and cherry tomatoes from the garden. I served the tomatoes with a side of black beans. Tasty!

Fried Green Tomatoes
Serves 2

3 under-ripe medium green tomatoes (should be firm to the touch)
3/4 c. corn meal
1/4 c. flour (I used a gluten free flour mix to make the recipe gluten free)
1/2 tsp. salt
1 tsp. cumin
2 pinches red pepper flakes
1 egg
1/4 c. milk (I used rice milk)
oil for frying (I used coconut oil)
avocado & cherry tomatoes for topping

Core tomatoes and slice into 1/2 inch slices. Lay on paper towels and pat dry. Season with salt and pepper.

Mix dry ingredients together in a medium bowl. Set aside. Whisk egg and milk together in a separate medium bowl. 

Heat 2 Tbsp. oil in a large skillet over medium heat.

Dredge tomato slices one by one into egg mixture then dry mixture (pressing to make sure it sticks). Fry about 3 minutes per side until golden brown. Depending on size of your skillet, you may need to do this in a couple of batches, rinsing pan (carefully, as it's hot and will steam) and adding more oil in between batches. Drain tomatoes on a paper towel.

Stack tomatoes on a plate. Top with avocado slices and sliced cherries. Enjoy!

Friday, September 4, 2009

pineapple fried rice


I've always loved fried rice. The version at the Chinese restaurant local to where I grew up included barbequed pork that tinted all of the rice pink. In college, I used to make it with tiny frozen shrimp, frozen green peas, and the fried rice seasoning packet that you would find in the grocery along with the packets for gravy and fajita seasoning. Though my tastes have moved on from barbequed pork and mystery seasoning that comes in a packet, my affinity for fried rice continues.

This one is filled with fresh ingredients that rivals the takeout we get from the Thai restaurant in our neighborhood. Bonus - it only takes a single pan (or wok) for easy clean up. Once the rice is cooked, the rest of the meal comes together in under 20 minutes. Healthy and efficient!

Pineapple Fried Rice
Serves 4

3 cloves garlic, mined
1 Tbsp. ginger, minced
1/2 tsp. Chinese chili paste
1 small yellow onion, diced
2 scallions sliced (including greens)
1 bell pepper (I had tiny ones from the CSA box, so I used 3: red, green, and orange)
4 oz. tofu, cubed (I used sesame baked tofu)
3 c. brown rice, cooked
8 oz. pineapple chunks

Heat oil in a large wok over medium-high heat. Add garlic, ginger, and chili paste. Stir fry 1 minute. Add onions, bell pepper, and tofu and cook about 5 minutes, stirring occasionally. Add rice and pineapple and cook until heated through. Top with additional scallions, if desired.

We enjoyed our fried rice along with veggie spring rolls.

Tuesday, September 1, 2009

veggie spring rolls


Marika and I had a trashy TV marathon over the weekend. The TV part is really just an excuse to get together - the real focus of these gatherings tends to be conversation, wine, and food. For the latter, I had been thinking that Thai sounded good. But I haven't been impressed with our last few tries of the local takeout places. So I decided to make my own.

I love spring rolls. It's surprising, now that I think about it, that it's taken me this long to try making them. Part of the issue is that I was never sure where to find the wrappers - this time, for example, I went to Whole Foods thinking they'd be in the refrigerated section with the tofu. I was briefly excited when I spotted something that looked like what I was seeking. My excitement turned to disappointment when I realized what I was holding were egg roll wrappers - suitable for deep frying, but not for the fresh healthy rolls that I was picturing in my head. Then a thought struck me. Rice wrappers probably start out in a similar form as rice noodles. I headed for the Asian Foods aisle. 

Bingo! A quick scan revealed two types of rice wrappers that would be perfect for spring rolls. One package contained 30 6" rounds. The other was larger and square. The circles looked like about the right size, so I selected those. (In retrospect, the larger squares might have been easier for a novice like me, but hey, I like a challenge!)

Anyone who's made spring rolls before (unless perhaps some have a spring roll making gene that I'm missing?) will appreciate that there's a certain art to making them look edible. My first few attempts bore little resemblance to the spring rolls of restaurants. But through trial and error, I started understanding how pliable I needed the wrappers to be and thus how long to leave them in the warm water before trying to roll them around veggies (the magic number was 11 seconds for my wraps, which got a little longer as the water temperature cooled). I learned how much filling was the right amount (not so little that the wrapper ends up loose, not so much that the veggies stick out or the wrapper breaks). I found it quite fun trying to make the perfect spring roll. I think it's a skill that will keep improving as I use it.

Though our spring rolls didn't look quite like what you'd get from your local Thai restaurant, the fresh taste and effort that had gone into them made up for it. We ate ours dipped in peanut sauce (add a little more water than called for in the recipe if needed to get to desired dipping consistency). Here's what I did:

Veggie Spring Rolls
Makes 12

1/2 c. bean sprouts
1/2 small head savoy cabbage, chopped
1/2 c. carrots, julienned
3 scallions, sliced (including green parts)
1/2 c. cilantro, chopped
3 Tbsp. lime juice
1 Tbsp. tamari
12 rice paper wraps

Mix all ingredients* except wraps in a medium bowl. Make first roll by soaking wrap in hot water for 10-15 seconds, then rolling about 3 Tbsp. of filling in the wrap. Repeat with remaining wraps. Finished wraps can be stored in the refrigerator until ready to eat. Serve with your favorite dipping sauce.

*My filling ingredients were the combination of a few different recipes I found online. As I often do, I picked and chose the parts that sounded good about each and meshed them together. 
Blog Widget by LinkWithin

Popular Posts