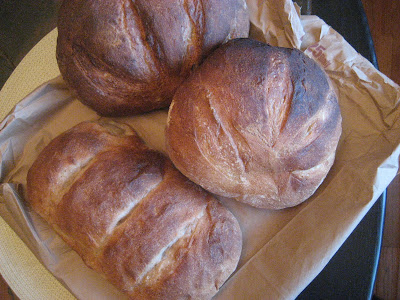
Fresh bread. Still warm from the oven. Crisp and golden on the outside, stretchy and soft within. Slathered with pasture butter. This is what I am experiencing right now. Words can't quite do my pleasure justice.
I have not one such loaf, but rather four loaves (the three pictured above, plus the least pretty of the quartet, which I am ripping hunks of off currently and enjoying immensely). In addition to the loaves, I have enough dough for 4-6 more and a generous heaping of starter that can be turned into even more delicious, beautiful rustic bread. This is the bounty I returned home with from the class I took this afternoon at Farm Kitchen, titled simply "rustic bread".
The session started with a lesson on rustic bread, listened to as the class (about 15 of us, including the surprise of an old high school friend) enjoyed a chunky butternut squash soup and sampled some of the rustic bread that had been made earlier in the day. Our teacher was Hollis, and it's clear through both her words and her apparent kitchen prowess that she knows what she's doing when it comes to baking bread. Rustic bread, I learned, is distinguished as such due to its long, cool fermentation period followed by working the dough to the right "gluten structure," which yields holes in the interior of the bread as the yeast forms carbon dioxide and stretches the dough.
 |
| Farm Kitchen |
 |
| Hollis, bread-maker extraordinaire |
The burning question I've been pondering since class is what interesting additions to make with my remaining dough. I will definitely do an olive and rosemary combo. I'm also pondering the combination of onions and cheddar cheese... If you have suggestions for other combinations, leave me a comment. In the meantime, you can envy my bounty of bread, and perhaps be inspired to try the following recipe, which is one of the ones we followed this afternoon.
You'll note that rustic bread making is not an immediate-gratification process: it takes a couple of days from start to finish. But based on the delicious bread I'm currently consuming, I'd say it's well worth it. In case you're wondering, we did not spend days in class. Rather, we did the baking with dough that had been pre-prepared for us, then made the dough to take home, which I plan to bake over the course of the coming week.
Pane Pugliese
Makes 2-3 loaves
DAY 1: make your starter ("biga")
1/4 tsp. active dry yeast
1/4 c. warm water
1 c. room temperature water
2 3/4 c. unbleached bread flour
Stir the yeast into the warm water and let stand until creamy, about 5 minutes. Stir in remaining water, then flour 1 cup at a time. Mix with a wooden spoon for 3-4 minutes. Place in container and keep at room temperature or in the fridge.
DAY 2: dough and first rise
1 c. biga
1 tsp. active dry yeast
1 1/2 c. warm water
3 1/2 - 4 c. unbleached bread flour
2 tsp. sea salt
Place biga in mixing bowl. In separate bowl, dissolve yeast in water. Add yeast, water and flour to biga. Mix thoroughly with wooden spoon. Dough will be somewhat wet.
Turn onto well-floured surface. Sprinkling more flour as needed as you go, knead dough until you can pull it slowly with your fingers and stretch to a thin translucent window (this indicates you've got the right gluten structure).
Place back in bowl (adding a little olive oil to the bowl first will help keep it from sticking). Cover with plastic wrap and let rise 12 to 24 hours in the fridge.
DAY 3: rise and bake!
Remove dough from fridge. Let sit at room temperature for about an hour. Turn dough out onto floured work surface. Divide into 2-3 pieces. Form a round loaf with each piece of dough and place on parchment paper. Allow to rise until doubled in size (1-2 hours).
Preheat oven to 450-500 degrees for 30 minutes. Slice the top of bread into pretty patterns if desired. Spray with water. Place in oven. Bake 20-30 minutes, rotating after 10 minutes.
cole's pane pugliese progression through photos:
 |
| The kneaded dough is ready to being its rise |
 |
| Rising dough and the biggest mixer I've ever seen! |
 |
| My oven-ready loaf |
 |
| The final product, fresh out of the oven |
 |
| Cole, the happy bread-maker |


No comments:
Post a Comment