Wednesday, October 31, 2012

spicy, salty, sweet toasted pumpkin seeds


Randy and I carved pumpkins last night. We were thinking it was probably the first time either of us had done so in at least a decade. In addition to providing an evening of entertainment, this project produced about 3 cups of fresh pumpkin seeds. Certainly something productive needed to come out of that.

My recipe below was inspired initially by this article. But whereas they preserved spicy, salty, and sweet for three different recipes, I decided to try a combination all in one. The result? Delicious.

The aroma of sugar and spice fills the house as I type this. Perhaps it will attract the neighborhood trick-or-treaters? I hope so, as we have quite a lot of candy on hand. Happy Halloween!

Spicy, Salty, Sweet Toasted Pumpkin Seeds

3 c. fresh pumpkin seeds
2 Tbsp. melted butter
4 Tbsp. brown sugar
1 tsp. cayenne powder
scant 1 tsp. salt
1/2 tsp. cinnamon

Combine all ingredients in a medium bowl. Spread spice-covered seeds evenly on a parchment-lined, rimmed baking sheet. Bake in 350-degree oven, stirring every 5 to 10 minutes until golden brown and toasted, around 35 minutes total. The seeds will continue to crisp as they cool.

Friday, October 26, 2012

easy roasted brussels sprouts with bacon and apple


It seems there are many people in the world who don't appreciate Brussels sprouts. 

I will never understand why.

I made these last night. The sprouts were roasted to caramelized perfection. The salty bacon was offset in just the right way by the sweet apple and tangy vinegar. A perfect fall dish. Brussels sprout skeptics may even be swayed...

Friday, October 12, 2012

banana chocolate cookies


"These are like no cookie I've tasted before" was the precise quote from Randy. I'm not sure if that was meant to be a good thing or not, but I'm going to take it as such, because I think these cookies are amazing. No butter. No eggs. No flour. What holds them together? Well, you can probably guess based on the title (it's brilliant): bananas. Finally, something to do with overripe bananas that goes way beyond your standard banana bread. The recipe is from 101cookbooks and you can find it here.

Bonus: no eggs in the dough means even the pregnant lady can sneak a pre-baked bite!

Friday, September 21, 2012

cherry cheesecake


Our friends Vanessa and Marcus joined us for a lovely dinner last weekend. Vanessa's birthday had been earlier that week, so while planning the menu, I inquired about her favorite desert. Thus came my motivation for making my first ever cheesecake.

smitten kitchen has long been one of my favorite food blogs, particularly for desserts. It didn't let me down in this case - there were a number of delicious looking and sounding cheesecake recipes to choose from. I landed on the New York Cheesecake.

I followed the recipe exactly, so I'll let you check it out via the link above vs. repeat it here. A couple of my own learnings from the process (recounting these here in part so I can remember when it comes time to making again to ensure I do so perfectly the next time):

  • Oven temp: For the beginning super high oven temperature, I set my oven to 500 degrees (the highest setting before broil). I checked it religiously for the first 10 minutes to make sure I wouldn't burn the top. I got distracted between minute 10 and when the timer went off at minute 12, during which time the top of the cake progressed from a beautiful cream to an unwanted deep brown. I quickly covered it loosely with foil and reduced the oven temp to 200 degrees for another hour. Luckily, I had caught it before the top was actually burned (rather it was just sable in color and little overdone), however the graham cracker crust did get singed from this mishap. Next time, I'll start out at 450 or 475 and make sure I watch more closely for the full first 12 minutes.
  • Doneness: Not sure if it's done? This is apparently a common question, for as soon as I had "how do you tell if a cheesecake" entered into Google, it already knew the rest of my search term. I consulted a couple of sites (including this one) and consensus seems to be that a 2-3" wobble in the center when gently shaken indicates the right level of doneness (if left up to my own devices, I would have left it in longer, so I was glad to have consulted the wisdom of those who know more than me here.
  • Puffed up cheesecake: Don't stress that your cheesecake has puffed up an inch or more above the top of the springform pan when you remove it from the oven (I had fears that I would have to somehow neatly trim the top, and while this would have eliminated my slightly-overdone-brown-top problem, this seemed like a daunting task). After cooling to room temp and then in the fridge for a bit, the cheesecake was back into the confines of its pan.
  • The cherries on top: The cherry topping in the recipe is delicious and works well to cover up a less-than-perfect cheesecake.

Sunday, September 16, 2012

my newest favorite kitchen gadget


Randy came home with the gadget pictured above earlier this week. He was pretty excited about his find; I was skeptical (albeit suddenly more understanding of his insistance that we bought a pineapple while at the grocery store that same day before the "surprise" was revealed). You've perhaps guessed by now (if you didn't know already) that the strange looking tool pictured above is a pineapple slicer.

One use later and my initial skepticism regarding the necessity of this gadget has melted away. While the perceived difficulty of transforming a pineapple from whole form to edible has never kept me from buying one, this tool makes the process so...incredibly...easy. And fast. And much less messy than my slice-it-and-trim-away-the-tough-outside-part-with-a-knife process. I am generally not a fan of single-purpose kitchen gadgets, however will make an exception for this amazing pineapple slicer.

Need one of your own (or for a kitchen maven in your life)? Sur Le Table can meet that need here.

Sunday, August 26, 2012

what to do with leftover pizza dough


My posts here have been SLOW lately. It's not that I haven't been cooking, but rather that life has been pulling in many other (good but time-consuming) directions. I've actually had the intention to post several times over the nearly two months that have gone by since my last...but time passes and I forget how to put together the random notes I have written on stickies, lose the compelling angle to the recipe I was going to describe, or the photos get buried among others of travel, ferris wheels, and weddings.

This time, I am not going to let that happen.

For the past few days, Randy's cousin, Jeff, and Jeff's son, Sam, have been visiting. They've been exploring much of LA and the surrounding area - venturing so far as San Bernadino yesterday for a quest to Randy Rhoad's (guitarist for Ozzy Osbourne) tomb. All of this exploring means the need for sustenance is great. Or at least that's one of the ways I've rationalized making all of the food we have in the past few days.

Homemade pizza on Friday night saw Randy making an extra batch of dough just as stomachs were starting to feel full. He of course already had a plan for the extra dough - something I had done the last time we made pizzas and had too much pre-made purchased dough on hand - homemade cinnamon rolls.

I cobbled the following together from a few different recipes. We ate the leftovers reheated in the oven this morning, enjoying the last bits of the sticky goodness. Rather than repeat the dough recipe here, I'll refer you back to the last post that details Rudy's special dough.

A Little Orange Cinnamon Rolls
Serves 8-10

Rolls:
1 recipe pizza dough (minus a small pizza, in our case*)
Flour for dusting
2 Tbsp. butter, melted plus more to grease pan
1 c. brown sugar
2 Tbsp. cinnamon
*I used the 8x8 square pan pictured plus a smaller version that fit 4 additional rolls; with a full batch of dough, I'd recommend using a 9x13" baking dish.

Topping:
2 Tbsp. butter, at room temperature
2 Tbsp. orange juice
1 tsp. vanilla
about a cup powdered sugar

Grease pan with butter. Roll prepared dough into a large rectangle. Brush with melted butter. Stir together brown sugar and cinnamon. Spoon mixture evenly over butter-coated dough. Beginning with long side facing you, roll dough into a long roll. Use a sharp knife to cut into 1 1/2" slices. Arrange slices side by side in baking pan and cover with plastic wrap. Refrigerate 30 minutes to overnight (I did the latter - makes for an easy morning breakfast).

Preheat oven to 350 degrees. Remove rolls from fridge and discard plastic wrap. Bake rolls until golden, about 30 minutes.

Meanwhile, mix topping ingredients, adding more sugar as needed to get a paste-like consistency. Spoon over hot rolls after they come out of the oven. Let sit a few minutes for the sugary buttery topping to melt; enjoy while still warm.

Thursday, July 5, 2012

pizza night!


This holiday week has involved an intense amount of midwestern heat and great food (some highlights: italian sausage, bbq chicken, a tasty reuben, and oh so much yummy custard!). Continuing this focus, we spent yesterday evening at Randy's brother's house, savoring hot pizza (amidst hot temperatures) straight from the pizza oven. Add to that Randy's family, some tasty guacamole, pina coladas, and fireworks, and you have yourself a wonderful holiday.

I lamented to Rudy, pizza-maker extraordinaire (and pizza oven craftsman), about my personal woes making pizza dough. Somehow, it never turns out quite right for me (to the point where Randy had to make totally new dough the last time I tried). Rudy was kind enough to share his recipe, which I've included below. Toppings for our pizzas last night involved various combinations of: tomatoes, sauce, mozzarella, sausage, onions, mushrooms, peperoni, ham, pineapple, and fresh basil from the garden. The final pizza out of the oven was a sweet cinnamon-y treat. Here are a couple pics of the delicious masterpieces:


The evening ended with a local firework show, observed from the comfort of the back deck. Thanks Rudy and Veronica, for great food, family, and a fantastic 4th of July!

Rudy's Pizza Dough

1 packet (1/4 oz) active dry rapid-rise yeast
3 c. bread flour
1 1/4 c. lukewarm water
1 1/2 tsp. honey
1 tsp. salt
1 Tbsp. olive oil
corn meal, for sprinkling

Mix half of flour with yeast, salt, water with honey dissolved in it, and olive oil. Beat with an electric mixer for 3 minutes on high. Mix in remaining flour (dough will be very sticky). Knead for 5 minutes on floured surface until smooth.

Place dough in a lightly oiled bowl and cover with plastic wrap. Let rise for 10 minutes in a warm place. If using a pizza stone, place it in oven. Preheat oven to 500 degrees (or hotter if you're using a pizza oven like Rudy's, which gets up to 700+ degrees!). Punch dough down and grab a handful. Cover the dough, rolling surface, and rolling pin with flour. Roll to about 1/4 inch thick.

Sprinkle your pizza peel or a ridge-less baking sheet with cornmeal. Place rolled dough on the cornmeal dusted pan. Top dough with desired toppings and slide onto hot pizza stone. Baking time will vary based on the temperature of your oven. They took about 2 minutes each in the 700-ish degree pizza oven.

Saturday, June 23, 2012

southwest stuffed bell peppers


A recent clear sign that I'm feeling fully settled in the new house and new city: I signed up for a local CSA. This means that every Tuesday, a box will arrive at our doorstep filled with fresh fruits and vegetables from local farms. The first delivery arrived last week with a wide variety of mouthwatering contents: nectarines, baby bok choy (yummm), romaine lettuce, beets, 3 heads of garlic, an avocado, carrots (from Coachella!) and two beautiful green bell peppers.

I love getting a box full of surprises each week. Even though I'm pretty adventurous at the grocery store and farmers' market, inevitably the box contains something (or sometimes, a number of things) that I likely would not have considered buying. This often leads to meals that I otherwise likely would not have thought to make. I love that sort of inspiration and the "outside of the box" thinking (pun intended!) it pushes me to partake in.

The challenge last week was that it had slipped my mind that the box was coming when we grocery shopped the weekend prior. Which left us with more than normal amounts of produce. Not a bad problem to have, but I had to get creative to ensure nothing went to waste. So, while the green bell peppers were beautiful, I had to figure out a good way to put them to use along with the red and yellow bell peppers I'd picked up at the grocery store. Enter stuffed peppers.

Before the box arrived, one of the week's dinner dishes in my head involved squash and black beans. I decided to repurpose these, plus some other ingredients I had on hand, into a southwestern pepper stuffing.

We ate two of the peppers hot out of the oven with a big side salad. The remaining two went directly into the freezer, to be rebaked at a later date, so that we could refocus our energies on eating the rest of our veggies over the remainder of the week!

Southwest Stuffed Bell Peppers
Serves 4

4 bell peppers, tops cut off and seeds removed (I chopped the tops and threw them in our salad)
2 Tbsp. olive oil
1/2 red onion, diced
2 cloves garlic, minced
1 small jalepeno, seeded and minced
a sprig of fresh oregano, chopped
2 Tbsp. cumin
2 bottleneck squash, diced
1 can black beans, drained and rinsed well
1 1/2 cups cooked brown rice
1/2 cup salsa
1/2 cup cheese, shredded (I would have used monterey jack if I had it, but in this case used the cheddar we had on hand)
sour cream (for topping, if desired)

Heat a large pot of water over high heat until boiling. Add peppers and boil 4 minutes. Remove carefully with tongs (another good use for the instrument I didn't see the need for but Randy convinced me were essential) to drain on a paper towel.


Heat 1 Tbsp. olive oil in a medium pan over medium heat. Add onion and garlic and saute until translucent. Add oregano and cumin, stirring to coat. Add jalepeno and cook 1 min. Add squash. Cook 2 minutes, until squash just starts to become tender. Remove from heat.

In a large bowl, mix squash mix together with beans, rice, and salsa.

Use the remaining 1 Tbsp. of olive oil to oil the bottom of a glass baking dish. Fill each pepper with the squash-bean-rice mixture and place in baking dish, open side up. Top with grated cheese.

Bake in a 350-degree oven for 30 minutes. Serve hot, topped with sour cream. Enjoy!

Sunday, May 13, 2012

I don't know what to call these...except delicious

Well, that's not entirely true - we did come up with a name...

...crunchy pig bowls.

Which admittedly may not resonate with all. But name aside, they are delicious. And ingenious. A bowl made of prosciutto, into which you can put any number of things that will subsequently be permeated with salty pork flavor as it bakes.

My friend Marika sent me some delicious looking recipes from Coastal Living magazine, which arrived in the mail last week (thanks Marika!). All looked scrumptious, but the 'individual prosciutto-and-spinach pie' recipe looked so good I had to make it immediately. We had no prosciutto on hand, so I substituted thinly sliced uncured ham, which worked terrifically (better than the prosciutto even). We enjoyed our first crunchy pig bowls at dinner time with a generous side of green beans.

They were so delicious that I made them again for breakfast this morning: this time with prosciutto (pictured above). The original recipe is for 12 pies (made using a muffin tin). While this would be perfect for a large brunch, 12 pies is a little silly for two people. So my version makes 2 in my Le Creuset Croquettes (ramekins would also work). I put in way more spinach than called for (the original recipe calls for a cup for 12 - I put in a little more than that for 2). And the addition of a splash of milk makes them oh so creamy. That recipe follows.

Tonight, I will bake our mac and cheese in individual prosciutto cups. I'm pretty excited.

Individual Baked Spinach Eggs in a Pig Bowl
Serves 2

4 slices thinly sliced prosciutto (or 2 thin slices of ham)
two handfuls of spinach, chopped
1/2 c. sharp cheddar (I used a white english cheddar), grated
2 eggs
a little less than 1/4 c. 2% milk
freshly ground black pepper
a generous pinch herbs de provence

Preheat oven to 350 degrees. Place prosciutto slices into the bottoms and up sides of two ramekins, overlapping in a crisscross pattern.  Toss spinach with half of the grated cheese. Put half of the spinach-cheese mix into each ramekin.

Break eggs into a bowl. Add milk, pepper, and herbs de provence. Whisk well. Pour egg mixture over spinach, dividing between the two ramekins. Top with remaining cheese.

Bake 18 minutes. Turn on broiler and broil 2 minutes.

Remove from oven. Allow to sit for 2 minutes. Using a spatula, gently loosen your individual pies from their dishes and place them on plates to be served. Enjoy!

Sunday, April 29, 2012

pretzel time


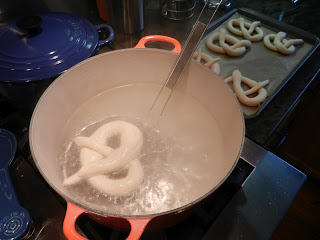
This weekend, I was introduced to two things with which I had not previously been familiar: Alton Brown's Good Eats series and making pretzels. The latter involved all sorts of fun new things: hand rolling (with a little pressure while stretching) elastic pretzel dough, forming pretzels, dipping them in a baking soda bath (2/3 cups of baking soda - I had no idea you could buy it in such large containers!), brushing with egg yolk and sprinkling with gigantic sea salt. And then the best part - ok, almost best part - watching them brown in the oven while the house filled with smells of bread baking loveliness. The best part came when we ate the pretzels - warm from the oven dipped in mustard (with ein bier und brat, natuerlich! oh, and I'm supposed to mention that the brats were cooked in beer - "Milwaukee style").

While we enjoyed the bounties of our labor, we watched the two-segment series on YouTube from Alton Brown's Good Eats, where he walks through how to make same pretzels that we did: first segment, second segment.

If you haven't made pretzels from scratch before, this is a super fun project. It takes a bit of time: an hour for the dough to rise and then an assembly line set of steps plus baking to get to final pretzel product. But one made pretzel and you'll realize it was all worth it. 

Here are some pics from our pretzel-making party:


Friday, April 6, 2012

blackberry baked french toast


All settled in the new house! This past week has been a busy one, between moving and working and entertaining. But I am getting comfortable in the new kitch, which has been used this week for some old favorites (camembert & caramelized onion crostini, pea and pancetta risotto, brown butter chocolate chip cookies - all part of entertaining a fun crowd last night) and a new one: the beautiful baked french toast pictured above.

Randy's friend Paul is visiting from Milwaukee this week. In the rundown of Paul's background that I was given, two of his passions stood out for me: history and breakfast. I don't have much of a brain for the first, but breakfast I can do. In my search for a baked french toast recipe I've used in the past, I came across a new one that sounded scrumptious (and an amusing new cooking blog: link to blog and original recipe) that I decided to try with a couple of twists.

One (brilliant) difference between this version and others that I've made is that you cut the bread into pieces. This results in a sort of french-toast-meets-bread-pudding custardy goodness that is hard not to love (and eliminates the challenge of trying to squeeze bread slices in the pan to ensure even egg coverage). All of the conveniences of baked french toast come through: easy night-before preparation, aesthetic result, amazing flavor. It makes a big pan, so perfect for bunch. You could definitely substitute other berries (perhaps even frozen ones?). The next time I make it, I'll include some chopped walnuts or pecans in the topping. But it's delicious as written. My main changes to the original recipe were substituting maple syrup for the white sugar called for and adding the blackberries. The original recipe calls for topping it with butter and maple syrup, but it was perfect for me as it was (and it's rare that I pass up an opportunity to drench something in maple syrup!).

We enjoyed our blackberry french toast warm out of the oven the first day and leftovers straight out of the fridge this morning. Sadly, two days plus two hungry guys means that this morning marked the end of this batch. Silver lining is the prospect of thinking up something new and delicious for our weekend morning breakfast tomorrow. I can deal with that.

Blackberry Baked French Toast
Serves 8-12, depending on portion size

French Toast:
1 loaf crusty bread, chopped into 1" cubes
8 eggs
2 c. milk
1/2 c. heavy whipping cream
1/3 c. pure maple syrup
1 Tbsp. vanilla

Topping:
1 stick cold butter, cut into pieces
1/2 c. flour
1/2 c. brown sugar
1 Tbsp. cinnamon
2 c. blackberries or other fresh berries

Generously grease a 9x11 baking pan with butter. Arrange bread cubes in pan.

In a medium bowl, whisk eggs, milk, cream, maple syrup, and vanilla. Pour mixture over bread in pan. Cover and refrigerate overnight.

The topping can be made the same night (and stored in fridge until ready to use) or the following morning as the oven is heating. Combine all ingredients (except blackberries) in a bowl. Use a pastry cutter until mixture is combined and the consistency of small peas.

Heat oven to 350 degrees. Remove pan from fridge. Top with blackberries and topping. Bake for 45 minutes for custardy goodness (longer if you prefer a dryer, crisper french toast). Enjoy!

Saturday, March 17, 2012

pizza pizza


Lesson 1 from the pizza-baking adventure earlier this week: after a pizza comes out of a 500 degree oven, even after it has sat for a bit and in spite of the fact that you really want to experience it's deliciousness, be cautious. And watch out for a tomato that is out to get you, like the incredibly hot one that slipped from the crust when I took my first bite and decided to attach itself to my chin. Ouch. 

Lesson 2: prebake the crust.

It was a certain someone's birthday earlier this week. I can't recall a time we've gone into a kitchen store together when he hasn't admired a pizza stone or peel, so those had been on my list for him for a while now. Pizza tools plus an evening baking pizzas together sounded like a fun way to celebrate the special day.

I made the dough in late afternoon (using a flour blend that claimed to be the perfect mixture for fabulous pizza crust - it seemed to work fine) and let it rise until we were ready to bake. Neither of us were clear on whether we should pre-bake the crusts or not (due to recipes with conflicting guidance), so we decided to try both ways. After all, we had enough dough for 4 pizzas...might as well experiment, right?

We also experimented with toppings. We started with the standard margarita pictured at the beginning of this post: homemade tomato sauce plus fresh mozzarella, tomatoes, and basil. Pizza number two is shown below (recipe follows). Pizzas three and four were combinations of the toppings on the first two. My favorite was definitely pizza number two. In one word: delicious. And it didn't contain a single attacking tomato.


Pizza with Caramelized Onions, Gorgonzola and Other Great Things
homemade or store-bought pizza dough, ready to be topped (see lesson 2)
2 Tbsp. olive oil
1 large yellow onion, thinly sliced
a handful of crimini mushrooms, sliced
2-3 oz. gorgonzola cheese, crumbled
prosciutto, thinly sliced
a handful or two of arugula

Heat oil in a large pan over medium heat. Cook onion until caramel brown, about 10 minutes. Spread onions evenly over pizza dough. Top with mushroom slices and gorgonzola. Bake until crust is golden*. Remove from oven. Top individual slices with prosciutto and arugula. Drizzle with olive oil.
*With a hot pizza stone in a 500-degree oven and pretty thin pre-baked crust, this took about 11 minutes for us, but cooking time will vary as all of these inputs do.

Monday, March 12, 2012

the secret to great french toast


I love weekends, primarily for two routines that have been recently reintroduced to my life: 1) coffee in the sunshine - made possible due to my frequent trips to LA; and 2) making breakfast - the pleasure of doing this for and with the man in my life (who is the reason for my frequent trips to LA).

It was coincidental that the second part of my weekend love led me to discover the secret to great french toast. It can be boiled down to two words: challah bread. I wanted to make french toast, but there was no bread in the house. So I set out on foot to see what I could find. Noah's Bagels had the answer. Two glorious mornings of coffee and sunshine and french toast have me convinced that challah bread is a new must-have component of this weekend morning ritual.

Saturday morning was the inception of the version pictured. On Sunday, I opted for a baked version, topped with homemade blueberry syrup and candied walnuts. One caveat: I didn't write down notes as I was cooking as I normally do, so the recipes that follow are based on memory, but should get you well on your way to some amazing french toast.

Challah French Toast (variation 1: standard)
Serves 2

4-5 1" slices of fresh challah
3 eggs
a generous splash of milk (about 1/4 cup)
about 1 tsp of pure vanilla extract
about 1 tsp of cinnamon

Heat skillet over medium heat (melt a tablespoon of butter in it if you want). Whisk together eggs, milk, vanilla, and cinnamon in a large bowl. Dredge challah slices one by one in egg mixture (both sides) then put directly into hot pan. While the first side is cooking, you can sprinkle some more cinnamon on the exposed side if you want. Once the first side is golden, flip each slice. Cook on second side until golden. Serve hot with your favorite french toast toppings (we enjoyed ours with a little more butter, pure maple syrup, and toasted walnuts).

Challah French Toast (variation 2: baked)
Serves 2

Heat oven to 350 degrees. Add another egg (to total 4) and an additional 1/4 cup milk (to total 1/2 cup) to the mixture described in variation 1. Whisk well. Butter a glass baking dish and arrange challah slices in the dish. Pour egg mixture evenly over bread. Bake for 40 minutes.

If you're feeling fancy, chop up some walnuts (1/4 cup) and mix with 2 Tbsp. melted butter and 2 Tbsp. brown sugar. Top your baking french toast with this halfway through the baking time. 

For easy blueberry syrup, put 2 handfuls of blueberries, 1/4 cup water and 1/4 cup maple syrup in a pot over medium high heat and cook until you have a beautiful dark violet syrup (let some of the blueberries retain their shape).

Enjoy!

Friday, February 24, 2012

black bean brownies

I am equipment impaired at the moment.

Perhaps that's why it has taken me until late February to write my first post in 2012. I also think it's taken me this long to adjust to being back to real life post-2011.

What a year 2011 was: some parts were amazingly happy while at others I was overwhelmed by the most intense devastation I have ever known; at times things were messy, at others there was crystal clarity on who I am and where I am going. There was divorce. There was cancer. There was death. There was love.

But I digress (a little heavy for a cooking blog, right?). So, let's get back to my current equipment limitations. Part of my back-to-real-life move involves a new living space in Northern California. It is comfortable, but small. The two burners, mini-fridge, and toaster oven haven't served as much inspiration for me to cook. Plus, I'm by myself. It's always interesting to me how I eat when I'm by myself, because it seems to vary quite greatly from when I'm with someone else. "Dinner" becomes composed of such things like nuts and grapes, or a bunch of kale (seriously: this is the one thing I have cooked consistently since being back in California).

The other kitchen I have access to is in Southern California (this is where the love piece from 2011 comes into play). And while his kitchen is more sizable, because it is also temporary and furnished by someone else, some things are lacking. This created the situation last night for a slightly more challenging brownie endeavor than I had planned. The amazing news is that, in spite of my numerous mishaps and equipment substitutions, the brownies still turned out super tasty. I have to think that actually following the instructions would make them even more so.

Yes, it's a little strange that black beans play a starring role. But somehow it works. My taste-tester wasn't able to guess the secret ingredient (though he'd tell you that I gave it away too quickly and he would have identified it eventually).

The following recipe is one that I've wanted to try for quite some time. Last night, I paired the brownies with fresh raspberries. Tonight, they will be enjoyed with vanilla ice cream. Once some things come together and there is a non-equipment challenged kitch in the picture again, I'll likely try making these again. In the meantime, we're enjoying the gooey chocolate goodness!

Amazing Black Bean Brownies
From 101 cookbooks
As written, makes 45 2-inch brownies

4 oz. unsweetened chocolate
1 c. unsalted butter
2 c. canned black beans, rinsed well and drained
1 c. walnuts, chopped
1 Tbsp. vanilla
1/4 c. instant coffee
1/4 tsp. salt
4 large eggs
1 1/2 c. agave nectar

Heat oven to 325 degrees. Line an 11x18" pan with parchment paper*.
*I didn't have this size pan, so halved the ingredients and put in a 8x11" pan, yielding probably thinner brownies than the original recipe.

In a glass bowl, melt butter and chocolate in microwave for 2 minutes on high. Stir to melt chocolate completely.

Add beans, 1/2 c. walnuts, vanilla, and a couple spoonfuls of melted chocolate into a food processor. Process about 2 minutes, until smooth.**
**I didn't have a food processor. I thought the blender would be a good substitute, but this ended up more challenging than I anticipated. I had to pour in the entire butter/chocolate mixture at this point to get enough liquid for the blender to do anything. I didn't quite get the smooth consistency desired, but I got as close as I could given my instrument! I also didn't read carefully enough and added all of the walnuts, unchopped, at this step. Given that I was trying to blend vs. process and I didn't get to totally smooth, I think my resulting product probably turned out pretty similar to what was supposed to happen by processing half of the walnuts and leaving the other half chopped.

In a large bowl, stir together the remaining walnuts, remaining butter/chocolate mixture, instant coffee, and salt. Mix well and set aside.

In a separate bowl, beat eggs with electric mixer until creamy, about 1 minute.*** Add agave. Beat well. Set aside.
***I didn't have an electric mixer, so substituted brute force whisking: lots of it.

Add bean mixture to chocolate/coffee mixture. Stir until well blended. Add egg mix, reserving about 1/2 cup. Mix well. Pour batter into prepared pan. Using an electric mixer, beat remaining 1/2 cup of egg mixture until light and fluffy. Drizzle over batter. Use a wooden toothpick**** to pull egg mix through, creating a marbled effect.
****I didn't have a wooden toothpick, so used a fork, which worked fine.

Bake 30-40 minutes, until set (30 minutes was the magic number for my halved recipe and smaller pan). Let cool completely in pan before cutting. Brownies will stay soft until refrigerated.
Blog Widget by LinkWithin

Popular Posts