Sunday, March 28, 2010

buttermilk whole wheat pancakes with strawberry maple syrup


I haven't been doing much post-worthy cooking lately. We are in the middle of moving: we got the keys to our new house (our new old house, I should say - it was built in 1950!) last week. JR and I are ecstatic to have a place that is truly ours.

Currently, the painters are working their magic inside (while I can appreciate the probably unintentional nod to Husky pride, the purple and yellow rooms need to be neutralized!), so we've been trying to stay out of their way. We've been packing and moving boxes filled with the items we can live without for the next week or so to the garage of the new place. Yesterday, I started what I thought would be a little project outside yesterday that has led to me excavating about 30% of the backyard. My body is sore and there is dirt under my fingernails, but my visions of the vegetable garden that will soon be growing there are keeping me motivated.

As you can imagine, the moving and house-related projects haven't left a lot of time for cooking. I've been doing a bit here and there, augmented with takeout. This morning, I found myself wide-awake at 7am. Too early for Home Depot (yes, we've quickly become one of those couples), so I decided to make breakfast.

I've never made pancakes from scratch before. But now that I realize the simplicity of ingredients that goes into them, I'm wondering why pancake mixes even exist. The only ingredient we didn't have on hand was any sort of milk product. I was looking through what we did have to see if I could make it work: about 1/2 c. soy milk, 1/4 c. half and half that JR uses for his coffee, or a can of lite coconut milk (which did get me thinking about some sort of coconut macadamia pancakes...might try that next time). But JR was willing to run to the store, so I had him pick up some buttermilk.

The following recipe is inspired by one from 101 cookbooks. The original recipe calls for blueberries, which aren't in season here quite yet, so I substituted frozen strawberries, which worked beautifully (and helped with my goal of emptying the freezer). The perfect fuel for another busy day! Here's what I did:

Buttermilk Whole Wheat Pancakes with Strawberry Maple Syrup
Serves 2

1 1/2 c. frozen strawberries
1/4 c. pure maple syrup
1 c. whole wheat flour
1/4 c. natural sugar (I used raw cane sugar)
1/2 tsp. baking powder
1/4 tsp. baking soda
1/4 tsp. sea salt
1 c. buttermilk
1 large egg
1 Tbsp. melted butter (melt it in the pan in which you'll cook the pancakes), plus more for pan and to serve

Put the frozen strawberries in a small pot over medium heat. Cook until fully defrosted and beginning to break down. Add maple syrup. Simmer 5 minutes. Use a potato masher to break up strawberries. Reduce heat to low and simmer until desired consistency.

Combine flour, sugar, baking powder, baking soda, and salt in a large bowl. In a small bowl, whisk together buttermilk, egg, and melted butter. Pour wet ingredients into flour mixture, mixing until just combined.

Heat skillet with a little butter over medium heat. The pan is ready when a drop of water sizzles. Add pancake batter 1/3 c. at a time. Cook 2-3 minutes per side, until golden brown. Serve pancakes topped with strawberry maple syrup.

Saturday, March 27, 2010

citrus tian


The 2010 March Daring Baker’s challenge was hosted by Jennifer of Chocolate Shavings. She chose Orange Tian as the challenge for this month, a dessert based on a recipe from Alain Ducasse’s Cooking School in Paris.

It's the perfect time of year for a citrus dessert. Our weekly CSA box has been overflowing with oranges lately. Lemons are growing on trees throughout the neighborhood, so I decided to include some of those as well. For as crazy involved as the prep for this dessert is, I was surprised that my shopping list for ingredients I didn't have on hand was quite small: pectin and whipping cream.

I made the tian over the course of 2 days: day 1 involved segmenting the citrus and making orange marmalade; day 2 was a Sunday filled with the remaining steps. The original recipe calls for making individual tians using cookie cutters as the mold. This sounded pretty labor intense to me, and I wanted to end up with something I could bring to work to share, so I made one large 9x13" pan. I wanted to see how the individual ones would turn out, though, so made two individual servings using a muffin pan for my molds.

We had a slight mishap with the caramel. JR was cleaning up after dinner and I grabbed the pot from the fridge and put it on the stove. Then I got distracted by something outside of the kitchen. By the time I got back, JR had dumped and washed my caramel pot, mistaking it for dinner remnants to be cleaned up. Whoops! I'm not going to lie; the thought of all of the time it took me to squeeze enough oranges for 1 1/2 cups of orange juice brought a couple of tears to my eyes. The orange caramel would have been very tasty. In its place, I caramelized straight sugar.

I was a little nervous about the "family style" version of the dessert, specifically, how I was going to get it to work and whether it would hold up (I had visions of the whipped cream giving out and it turning into a big pile of mush). I ended up freezing the tian in the 9x13" pan for 2 days. The night before traveling with it, I dislodged it from the pan and cut it into bit-sized pieces, which I placed in individual muffin papers. I then put the bit-sized, papered pieces back into the pan in 2 layers and put it all back in the freezer. The frozen tian travelled beautifully. It defrosted in the fridge during the day, then I served it sprinkled with mint in the afternoon. It was gobbled up quickly, which I take to be a good sign!


Ready for the longest recipe ever? Here goes:


Orange Marmalade:
1/4 c. + 3 Tbsp. freshly squeezed orange juice*
1 large orange
cold water
1 heaping tsp. pectin
agave nectar or sugar
*The original recipe uses weights rather than volume, which is why the amounts of some of the ingredients seem a little strange.

Finely slice orange (including rind). Place in a medium pot filled with cold water. Simmer 10 minutes. Discard water, refill with cold water, and blanch another 10 minutes. Repeat this process for a total of 3x (this removes the bitterness from the orange peel). Once cool, finely mince in food processor.

Measure orange (on a scale or with measuring cups): this is the amount of sweetener you will use. The original recipe calls for granulated sugar, but I substituted a combination of agave nectar and washed raw sugar (I would have used entirely agave nectar, but I ran out!).

In a pot over medium heat, add minced orange, sugar, orange juice, and pectin. Cook until jammy, 10-15 minutes. Refrigerate.


Citrus Supremes:
3 lemons
6 large oranges

Cut oranges into a shallow bowl, making sure to keep the juice. Add segments to bowl with juice. I learned how to correctly segment an orange by watching this YouTube video.


Pate Sablee:
2 medium egg yolks, at room temperature
6 Tbsp. + 1 tsp. granulated sugar
1/2 tsp. vanilla
1/4 c. + 3 Tbsp. unsalted butter, ice cold and cubed
1/3 tsp. salt
1 1/2 c. + 2 Tbsp. flour
1 tsp. baking powder

Place flour, baking powder, butter, and salt in food processor with a steel blade. In a separate bowl, combine egg yolks, vanilla, and sugar. Beat with whisk. Pour egg mixture into food processor (my food processor isn't that big, so at this point I transferred everything to the KitchenAid). Process until dough just comes together. If too crumbly, add a couple drops of water and process again. Form into a disk, cover with plastic wrap, and refrigerate 30 minutes.

Preheat oven to 350 degrees. Roll dough onto lightly floured surface 1/4" thick. At this point, the original recipe calls for cutting the dough with cookie cutters that will ultimately be used to create the mini-desserts in. Instead of this, I made one large 9x13" rectangular dessert. I had a little dough left over, so also made 2 personal versions in muffin pans. That means for the dough, I had one big rectangle, and two small circles.

Bake 20 minutes, or until dough starts to turn golden.


Caramel:
1 c. granulated sugar
1 1/2 c. + 2 Tbsp. orange juice

Place sugar in pan on medium heat and begin heating it. Once it starts to bubble and foam, add orange juice. As soon as mixture starts to boil, remove from heat and pour half of mixture over orange segments.

Reserve other half in a small bowl (you'll use it later to spoon over finished dessert). When dessert is assembled and in freezer, heat kept caramel sauce in small saucepan over low heat until it thickens and just coats the back of a spoon (about 10 minutes). Spoon over citrus tians.


Whipped Cream:
3 Tbsp. hot water
1 tsp. agar flakes
1 c. heavy whipping cream
1 Tbsp. confectioner's sugar
1 Tbsp. orange marmalade

In a small bowl, combine agar and hot water. Stir until agar dissolves. Let cool to room temperature while you make whipped cream.

Add cream to chilled mixing bowl. Whip with hand mixer on low until it begins to thicken (about 1 minute). Add sugar. Increase speed to medium-high. Whip until beaters leave visible but not lasting trails in cream. Add cooled agar slowly while beating continuously. Continue whipping until light and fluffy and soft peaks form. Fold in orange marmalade.


Assemble Dessert:
Drain citrus segments on paper towels. Have marmalade, whipped cream, and dough ready to use. Arrange citrus segments in bottom of pan. Make sure all touch and there are no gaps. Add whipped cream by the spoonful and gently spread in an even layer to cover orange slices. Spread even layer of marmalade on dough. Place dough onto dessert. Gently press to make sure dessert is compact. Place in freezer to set for 10 minutes.

Use a small knife to go around the edge of the pan to make the dessert easy to unmold. Place cutting board over pan and gently flip to unmold. Cut into small squares. Add a spoonful of caramel sauce and serve!

One year ago: anchovy caesar salad

Sunday, March 21, 2010

minestrone soup


I woke up at 3am this morning. I lay in bed, knowing I should be sleeping, but unable to turn off my suddenly wide awake mind. So I started thinking about what to make for dinner. Yep, I'm totally serious. I thought through the contents in our fridge and pantry, I thought through what could be added via a trip to the grocery store. What to make, what to make...I finally landed on minestrone soup. Sometime after that, my mind thankfully surrendered itself to dreams again.

Before titling this post minestrone, I did a bit of research to make sure the name would be appropriate. Minestrone is Italian for the big soup. It turns out that there is no set recipe; rather, the content varies across Italy and by season. It can have meat, but doesn't have to (my version is vegetarian). It can contain rice or pasta, but it isn't required (I didn't include any). And it's the perfect way to use up the myriad of veggies in my fridge.

I love recipes like this one, that can be modified based on the ingredients you have on hand. If you don't have everything listed below, don't worry about it - omitting an ingredient or two will still yield a tasty meal. If you have other things in mind that might go well, throw them in, too. Have fun with it! Here's the version we ate for dinner tonight:

Minestrone Soup with Parmesan Toasts
Serves 6ish

2 Tbsp. olive oil
2 cloves garlic, minced
1 shallot, diced
1 onion, diced
2 c. potatoes, diced
1-2 c. carrots, diced
1-2 c. celery, diced
1 tsp. dried or 1/2 tsp. fresh basil, chopped
1 tsp. dried or 1/2 tsp. fresh oregano, chopped
1/2 tsp. dried or 1/4 tsp. fresh thyme, chopped
freshly ground black pepper
3 c. vegetable broth
1 c. water
1/2 c. red wine
1 can diced tomatoes (with juiced)
1 can cannellini beans, rinsed and drained
1 bunch baby dino kale, chopped (or substitute 1 bunch regular dino kale, center rip removed and chopped)

Heat olive oil in a large soup pot over medium-low heat. Add garlic. At this point, I started chopping my way through the vegetables in the order listed above, adding each to the pot as I was done chopping it, stirring occasionally. By the time you've added the last of the celery, the onion should be translucent, the other veggies are beginning to become tender, and the aroma of simmering veggies fills your house.

Add herbs and spices. Stir well to disperse through veggies. Cook an additional few minutes. Add broth, water, wine, and tomatoes. Bring to a boil, then reduce heat and simmer 40 minutes (or longer, if you have more time and patience). Add beans and kale. Cook an additional 20 minutes.

Serve hot, topped with parmesan toast if desired (recipe below).

Parmesan Toasts:
olive oil
1 small baguette, sliced into 1/4" rounds
1 clove garlic, halved
1/4 c. parmesan, finely grated

Heat oven to 375 degrees. brush baguette rounds with olive oil. Bake 5-7 minutes, until just beginning to turn golden. Once toasts have cooled enough to handle, rub with cut side of garlic. Sprinkle each toast with parmesan. Return to oven until parmesan begins to melt, 2-3 minutes.

Wednesday, March 17, 2010

kale & cannellini crostini


Every Wednesday, our team at work has "tea time", a 30 minute segment away from computers and meetings where we can take a break and chat while noshing on tasty snacks. Each week, two people sign up to host and determine what will be served. In the past, treats have run the gamut, ranging from cupcakes to traditional cucumber tea sandwiches (with the crusts cut off!) to wine and cheese (what's better at 3pm in the afternoon?).

This week, Jennifer and I are hosting. Our tea time happens to coincide with St. Patrick's Day, which made me feel that I needed to make something green. I'm not a big fan of artificial food coloring, so decided to go with a natural green, and one of my favorite veggies: kale.

Kale is not what I would traditionally think of as finger food. But serving it along side crostini and some tasty cheese should do the trick. In addition to the kale crostini, I brought a sweet citrus treat that is the focus of this month's Daring Bakers' Challenge (tune back in on March 27th - the release date - for details), and a pistachio spin on peanut butter crispies. Here is the crostini recipe:

Kale & Cannelini Crostini
Makes 20-30 crostini

crostini:
1 sour baguette, thinly sliced
olive oil
1 clove garlic, peeled and sliced in half

Preheat oven to 375 degrees. Brush bread slices with olive oil. Arrange bread on baking sheet. Bake until beginning to color, about 6 minutes. Rub toasts with halved garlic clove.

kale & cannellini topping:
3 Tbsp. extra virgin olive oil
3 cloves garlic, minced
1/2 tsp. red pepper flakes
2 bunches tuscan kale, destemmed and chopped into 1" pieces
sea salt & freshly ground black pepper
1 c. veggie stock
1 can cannellini beans, rinsed and drained
pecorino cheese, to top

Heat olive oil, garlic, and red pepper flakes in a large pot over medium heat. When garlic is golden, add kale, salt, and pepper. Cook for 30 minutes, stirring occasionally.

Add veggie stock and beans. Cook until beans are hot and mixture is reduced.

To serve, top crostini with kale mixture and a thin slice of cheese.

One year ago: tomatillo salsa verde

Sunday, March 14, 2010

beginner's bread


I am definitely a novice when it comes to bread baking. I think I've only made one loaf before (after being inspired by stories of daily bread baking in
Animal, Vegetable, Miracle). The loaf given to us by JR's running buddy last week reminded me how fantastic freshly baked bread can be. So I decided to give it a shot. In my internet searching, the first few recipes I came across involved yeast and water sitting together overnight; I was hoping for something a little less involved.

Then I came across one that could be made within a day. One that doesn't require any kneading. Eureka! Given that my day today is going to be filled with some other serious kitchen stuff (the March Daring Bakers' Challenge; more on that soon), low effort fresh bread sounded perfect.

Learnings from bread making today in Cole's Kitch:
  1. Put a knife next to the rising dough as the oven is heating; this will serve as a reminder to slash the top of the bread before putting it in the oven. I forgot to do this to my first loaf, but remembered after the bread had been in the oven for 10 minutes. I decided I'd try doing it at that point, but it was long enough that the outside had already begin to harden, so rather than a pretty bread top, I ended up with a baguette with knife cuts in it.
  2. Don't preheat the pan that goes under the bread as it's baking. I had thought the pan was supposed to go in at the same step as the pizza stone. I learned this was incorrect when the water I poured into my (very hot) Le Creuset dish caused it to crack in half. :-( When I baked the second loaf, I used a square metal pan and put it into the oven the same time as the bread, which yielded no casualties.
  3. Fresh baked bread is really, really yummy. I should make it more regularly.
The following recipe was adapted from one I found on Anissa's Kitchen. I cut the recipe in half and substituted whole wheat flour for part of the regular flour called for (both changes are reflected below), but followed her technique (except for the unfortunate deviations described above!). One other exception: rather than use a wooden spoon to to the mixing as called for in the recipe, I let my KitchenAid do all of the work for me.

No Knead Artisan Bread
Makes 2 1-pound loaves

1 1/c c. lukewarm water
1 packet fast acting yeast
2 tsp. sea salt
2 c. all purpose flour
1 1/4 c. whole wheat flour

Add yeast and salt to water in the bowl of KitchenAid stand fitted with dough hook attachment. Add flour and mix until everything is uniformly moist, without any dry patches. The dough should be loose and wet.

Cover bowl with towel and allow to rise at room temperature for 2 hours. Move bowl (still covered with towel) to refrigerator and leave there to continue to rest for at least 3 hours. You can use a portion of the dough any time after this point. I made mine all in the same day, but the original recipe says that the dough will last in the fridge for up to 14 days. (Which could actually make daily bread making feasible...)

Place a piece of parchment paper on unrimmed baking sheet. Dust hands with flour. Pull up and cut off about a 1-pound piece of dough (the size of a grapefruit) using a serrated knife. Gently stretch the surface of the dough around to the bottom to make the top smooth with some surface tension. Place on parchment paper. Let rise, uncovered, for 40 minutes.

Preheat baking stone in middle rack in oven for 20 minutes at 450 degrees. Place empty rimmed baking on rack below stone. Dust loaf with flour and slash the top with a serrated knife. Slide bread (including parchment paper) onto preheated stone. Pour 1 cup water into pan underneath and close door. The steam this creates will yield a nice crisp crust on bread. Bake 20-30 minutes, until deep golden brown.

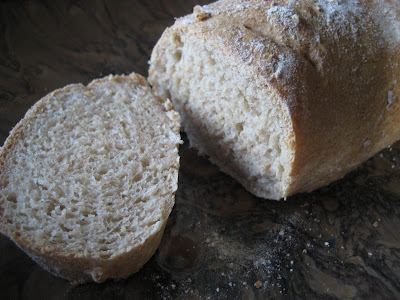
We enjoyed our ugly loaf straight out of the oven with butter and it was fantastic. Loaf number two (pictured above) looks as good as it tastes!

One year ago: fish tacos

Saturday, March 13, 2010

maple-infused french toast


This past Monday, JR returned from his morning running group with a loaf of bread. One of his running mates had made it for us as an early housewarming gift. It was a hearty round that definitely contained whole wheat flour, with an interesting flavor hinting possibly at rye or anise.

I've been eating it all week long.

Initially, we dipped it in olive oil at dinner. Then I ate a couple mornings for breakfast toasted with butter and honey. On Thursday, I chopped and toasted part of the loaf into croutons for a salad. This morning, we finished it off in the form of french toast.

Maple-Infused French Toast
Serves 2

1 Tbsp. butter, divided
2 apples, peeled, cored, and chopped
1/4 tsp. cinnamon
1/4 tsp. nutmeg
4 eggs
3 Tbsp. maple syrup, plus more to serve
1 Tbsp. milk
1/2 tsp. vanilla
4 slices of rustic bread

Heat a skillet over medium heat. Add half of butter and apples. Cook, stirring occasionally, until apples soften and begin to brown, about 5 minutes. Reduce heat to low. Add spices and stir to distribute. Keep warm over low heat while you prepare french toast.

Combine eggs, maple syrup, milk, and vanilla in a medium bowl. Heat a large skillet over medium heat. Add remaining butter to skillet, spreading it with a spatula to cover the pan. Dredge bread one slice at a time into egg mixture, then arrange in skillet. Cook until the first side begins to brown, about 2 minutes. Flip and cook other side until it begins to brown.

Drizzle french toast with a spoonful of maple syrup and top with apples.

One year ago: squash risotto

Wednesday, March 10, 2010

skillet poached huevos rancheros


I've been intrigued by poached eggs lately.

I think it started with the Momofuku cookbook, where there are two pages dedicated to the slow-poached egg story and recipe, which I haven't yet attempted to replicate. Then, this past weekend, a small soft poached egg with lobster was one of my favorite courses at The French Laundry.

I've only made a poached egg once that I can recall. I do remember eating many as a child - my mom used to make them in the funny shaped pan and we'd eat them on toast. There is something lovely about the white, jelly-like shell encasing a gooey orange center; I can't believe I let myself forget about poached eggs for so long.

This past Sunday, when I was figuring out what we'd eat for the week, I consulted a file folder where I keep notes of recipes I'd like to try. One in particular called out to me, likely due to the poached egg. The original recipe is from January 2010 Real Simple (torn from the magazine at my mom's house); I adjusted some of the ingredients and amounts in the version below.

Skillet Poached Huevos Rancheros
Serves 2

1 15 oz. can pinto beans, rinsed
1 c. salsa
2 large eggs
kosher salt and black pepper
2 scallions, sliced
1/4 c. chopped fresh cilantro
2 small flour tortillas, warmed
sour cream and avocado slices, to serve

In a medium skillet, combine salsa and beans and bring to a simmer over medium heat.

Make 2 wells in the bean mixture. One at a time, crack each egg into a small bowl and slide it gently into a well. Season with salt and pepper. Cook, covered, over medium heat, 3 to 5 minutes for slightly runny yolks.

Sprinkle with scallions and cilantro. Divide among plates and serve with tortillas, sour cream, and avocado slices.

Monday, March 8, 2010

tuna italiano with swiss chard


During a sunbreak on Sunday while JR was on one of his many-hour-long bike rides (he's in the middle of ironman training), I decided I'd get out of the house for a bit for some exercise as well. It's finally starting to feel like spring outside: the air is a touch warmer and the ornamental cherry and pear trees are in full bloom. After returning from a jog, I decided that we needed something more substantial than the typical Sunday afternoon fare of random leftovers. My concoction turned out to be an easy, filling, and tasty dish - just what JR and I needed after our active morning! Here is what I did:

Tuna Italiano with Swiss Chard
Serves 2-3

8 oz. pasta
olive oil
1 small red onion, chopped
1 clove garlic, minced
dried oregano
1 bunch swiss chard
1 can tuna, drained
2 c. tomato sauce
10ish kalamata olives, pitted and sliced
grated parmesan, to serve

Cook pasta according to package directions. Drain and set aside.

Destem chard, reserving stems. Chop stems and leaves (separately) and set aside.

Heat 2 Tbsp. olive oil in a large pan over medium heat. Add onion, garlic, and chard stems. Cook until soft and beginning to brown, about 10 minutes. Add oregano, tuna, and tomato sauce, stirring to combine.

Add chard leaves to pan (don't stir). Cover. Allow to steam until chard is bright green and tender, about 5 minutes. Add drained pasta to pan. Stir well. Serve topped with freshly grated parmesan cheese.

Saturday, March 6, 2010

the best part of The French Laundry


...was the butter. I'm not even kidding. Yes, there were other highlights from the meal. I will get to those. But bear with me for a moment while I rave about the butter. This butter was something else. I will go so far as to say it was the best butter I've ever tasted.

After an amuse bouche (little cheese-filled bits of fried dough that tasted like the best cheese nips ever) and what looked like miniature ice cream cones filled with iced salmon puree and creme fraiche (JR) and iced avocado puree and creme fraiche (me), two butters were placed on the table. The first was described as an unsalted butter from Andante Dairy in Petaluma, CA. It was a beautiful shade of yellow-orange, almost like the yolk of an egg and tasted incredibly creamy. The second was from Animal Farm in Orwell, VT (obviously a perfect name for the location). It was topped with fleur de sel and was amazing. I could have eaten spoonfuls of it. That wasn't necessary, however, because there were three bread services throughout the meal, with different choices each time, all freshly baked by the Bouchon bakery down the street (the waiter told us Bouchon makes 2 deliveries during each service, which means no bread is ever more then 2 hours out of the oven).

My favorite course of the meal was the turnip soup. I realize that sounds strange as I type it; I certainly wasn't expecting turnip soup to be terrific. The presentation was great (I love when they reveal the big bowl with practically nothing in it, then pour the soup over the small treasures). But what impressed me most was that you were hit with a different flavor and texture with each bite: turnip soup with the sharp bite of ginger, turnip soup with tangy, juicy grapefruit, turnip soup with crunchy, toasted hazelnut.

Why were we at The French Laundry? My birthday week, which began last Sunday with my cake baking, ended today with a 9-course meal at one of Napa Valley's most famous restaurants. Our reservation was for a late lunch. Though I had initially been hoping for a dinner reservation, this turned out to be a blessing in disguise. Even for lunch, it was a 3 hour meal (I've heard dinner can take in excess of 5 hours, which makes me extremely happy that we didn't opt for the 9:30PM reservation!).

Our choice was between two menus: the Chef's Tasting Menu, or the Tasting of Vegetables. I hadn't made up my mind until our whispering waiter started telling us more about the Chef's Tasting Menu. When he got to calf's brain, my choice became easy: Tasting of Vegetables. JR went with the meatier option (though chose rabbit over the calf's brain), so we were able to trade tastes when we wanted to, and I was happy throughout the meal that I chose the more veggie-focused menu. The one possible exception was his course of "peas and carrots"; the forkful of lobster with pureed carrot sauce was perhaps the best single bite of the whole meal.

Yes, I was tempted, but no, I did not take any pictures of the food. The presentation was beautiful across the board and would have photographed extremely well, but I had promised myself that I would not be that person. Restraining myself from snapping a pic was the hardest when I was presented with the salad of beets. It wasn't a salad at all, but rather varying sized perfectly circular little beet tastes with apple swimming in a vinaigrette made of rhubarb and olive oil. It was a vibrant shade of pink and was served on a round plate with a slightly sunken square in the center of it, where the salad was contained. Beautiful. And certainly the best beets I've ever eaten.

Some other observations about the restaurant that are with me hours later: There were beautiful gardens across the street, where herbs, chard, and other veggies were growing (I didn't venture out too far in my heels, so not sure exactly what else it contained, though several of my courses listed ingredients from the garden). Inside the restaurant, there was less ambiance than I had imagined there would be, though I suppose in a way this makes you concentrate on the food even more, so perhaps that is by design. There were many (many) bustling waiters in suits. I never had to fill my water from the bottle at the table; someone was always there to fill it before needed. All plates and silverware were exchanged for new between each course. Within 45 seconds of leaving the table to go to the restroom, a new, crisply folded napkin was put in place of the one I had taken off my lap (yes, I asked JR to time it).

I'm glad we went and the food was absolutely amazing. I won't be clamoring to return to The French Laundry any time soon. I've experienced it. There are too many other fantastic restaurants to explore. But it was a certainly fantastic way to celebrate 30 years and 3 days!


THE FRENCH LAUNDRY
TASTING OF VEGETABLES | 6 MARCH 2010

TOKYO TURNIP SOUP
Ruby Red Grapefruit, Hazelnut
and Ginger "Panna Cotta"

SALAD OF FRENCH LAUNDRY GARDEN BEETS
Granny Smith Apple, Black Truffle, Manni Olive Oil
and Rhubarb "Vierge"

"PAVE D'ABERGINE CONFIT"
Cauliflower, Chick Peas, Sultanas, Harissa,
Pine Nuts, Cilantro and Yogurt

SOFT-POACHED AMERICANA HEN EGG
Lobster "Salpicon," Sunchokes, Savoyard Spinach
and "Mousseline Bearnaise"

HERB-ROASTED HEN-OF-THE-WOODS MUSHROOMS
Fennel Bulb, San Marzano Tomato Compote, Green Garlic,
Marcona Almonds and Sherry Mignonett

YUKON GOLD POTATO "MILLE FEUILLE"
French Laundry Garden Broccolini, "Piperade," Spring Onion,
Nicoise Olives and Creme Fraiche

ANDANTE DAIRY "CAVATINA"
Apricots, Toasted Oats, Celery
and 100-Year-Aged Balsamic Vinegar

CARAMELIZED WHITE CHOCOLATE SORBET
with Candied Kumquat and Goma Meringue

"POIRE POCHEE A LA VANILLE"
Walnut Pain de Genes, "Nocino Gelee"
and Grains of Paradise Sherbet

MIGNARDISES

6640 WASHINGTON STREET, YOUNTVILLE CA 94599 707.944.2380

garlic broccoli soba


Last week, I was invited to a recipe exchange. You've probably seen something like this before - the email asks that you send a recipe to the person listed below, then forward the message to 20 of your friends, swapping your name for the sender's, and the sender's name for the person's name who you sent the recipe to and probably don't know.

The idea is that you should get a boatload of recipes from the friends of those friends you forward the email to. But whether that happens is dependent upon whether the friends you forward the email to actually forward it on, and ultimately, whether the friends of friends decide to respond. Yes, it sounds confusing, but you can see how it could work.

The last time I responded to one of these, I think I only received one recipe in return. Lack of follow through of friends, or of friends of friends? Who knows. I was expecting something similar this time, so was surprised to find that I've been receiving recipes from strangers all week long. Those I've received range from ice cream to chicken poblano, and lots of things in between, including one for "spicy broccoli soba saute".

This one caught my eye because 1) I have two weeks' worth of broccoli from the CSA delivery on hand (I've been a serious vegetable slacker this past week) and 2) it made me think "yum" while I was reading it (generally a good sign).

I played with the amounts of the various ingredients, made lots of substitutions (some highlights: swapped agave for sugar and arrowroot powder for cornstarch, decided some freshly squeezed orange juice would contribute good things to the flavor, kicked up the garlic, and substituted vegetable stock for sake), but kept with the spirit of the dish. Kathryn and Jennifer, if you're reading, thanks for following through and for the inspiring recipe!

Garlic Broccoli Soba
Serves 2

3 Tbsp. soy sauce
2 Tbsp. freshly squeezed orange juice
1 tsp. agave
1 tsp. rice vinegar
1 tsp. toasted sesame oil
1 tsp. arrowroot powder
6 oz. soba noodles
1 tsp. vegetable oil
3 cloves of garlic, minced
1/2 tsp. red pepper flakes
3 c. broccoli, cut into bit-sized florets
1/4 c. vegetable stock
1 carrot, peeled and grated

Whisk together soy sauce, orange juice, agave, rice vinegar, sesame oil, and arrowroot powder in a small bowl. Set aside.

Heat a large pot of boiling water. Cook soba noodles according to directions.

Meanwhile, heat oil in a wok over medium heat. Add garlic and red pepper flakes; cook until golden, about 1 minute. Add broccoli and water. Cover and cook until broccoli is bright green, 3-4 minutes.

Stir in carrots and sauce, mixing well to distribute. Cook for a minute or two, until sauce thickens. Reduce heat to low.

Add cooked soba noodles to wok. Mix well to coat noodles with sauce and distribute the veggies.

We enjoyed our soba noodles with leftover fish. Had it not been for that, I would have added some tofu for protein. Mushrooms would also be a great addition to this dish.

One year ago: lemon pepper fennel

Wednesday, March 3, 2010

amazing citrus olive oil cake


I came across this recipe a few weeks ago when I was in Washington state at my mother's house and knew immediately that I would make it for my birthday. My 30th birthday. What better way to celebrate three decades than with a sophisticated olive oil cake?

I'm not a big cake baker. Or rather, I haven't been. I've made only a handful of cakes in my life (and I think all of them have involved a boxed mix...). But if there are many others out there as good as this one, I think that might change.

The sweet citrusy smell of this cake fills the whole house as it's baking. I happened to make it on the warmest Sunday on the peninsula to date this year with the windows open, and I'm sure made the neighbors jealous.

The cake recipe is from Orangette. I decided to make a bundt cake, rather than the 9" round directed in the recipe (though, courtesy of my mother, I am the proud new owner of both types of bakeware - thanks Mom!). The recipe for candied orange peel is from an old issue of Bon Appetit. Happy birthday to me!

Citrus Olive Oil Cake

1 medium orange
1 lemon
6 oz. raw almonds
1 c. all purpose flour
1 Tbsp. baking powder
4 large eggs, room temperature
1/2 tsp. salt
1 1/2 c. sugar
2/3 c. olive oil (I used meyer lemon olive oil from the farmers' market)
confectioners sugar, for dusting
candied orange peel (optional; recipe below)

Put the orange and lemon in a large pot and cover with water. Bring to boil over medium-high heat. Reduce heat and simmer for 30 minutes. Drain and cool.

Meanwhile, toast almonds on a baking sheet in a 325 oven for 10-15 minutes. Allow to cool. Pulse in a food processor until the almonds are the texture of coarse sand.

Set oven to 350 degrees. Grease bundt pan and dust with flour. Set aside.

When the citrus is cool, cut the lemon in half. Scoop out and discard the pulp and seeds. Cut the orange in half and discard any seeds. Put the lemon rind and orange halves (with pulp) in food processor (no need to clean it between the almonds and this step). Process until you have a thick paste.

In a small bowl, combine flour and baking powder.

In a mixing bowl, combine eggs and salt. Beat until foamy. Slowly beat in sugar. Fold in flour mixture. Add almonds, citrus, and olive oil. Beat on low speed just enough to incorporate (don't overmix). Pour into prepared pan.

Bake 1 hour, until a toothpick inserted in the center comes out clean. Cool for 20 minutes in pan on a wire rack. Remove from pan.

To serve, dust with confectioners sugar and top with candied orange peel.


Candied Orange Peel
Makes about 1 cup

1 large orange, 1/4 inch of top and bottom cut off
2 c. sugar, divided
1 1/2 c. water

Cut peel on orange into 4 vertical segments. Remove each segment (including white pith) in 1 piece. Cut into 1/4-inch wide strips. Cook in a large pot of boiling water for 15 minutes. Drain and rinse well.

Bring 1 1/2 c. of water and 1 1/2 c. of sugar to a boil in a medium saucepan over medium heat, stirring to dissolve sugar. Add peel. Return to boil. Reduce heat and simmer until peel is very soft, about 45 minutes. Drain.

Toss peel and 1/2 c. sugar on rimmed baking sheet, separating strips. Lift peel from sugar; transfer to a sheet of foil. Let stand until coating is dry - 1 to 2 days. Candied peel can be wrapped and frozen for up to 2 months.

One year ago: birthday bananas
Blog Widget by LinkWithin

Popular Posts